Saturday, April 12, 2014

Oatmeal M&M Cookies

Hi Everyone!  Today I made a recipe that my father will not leave alone.  No, really, he won't leave it be.  He has eaten FOUR of these already, and he says that he wants some more for dessert!  They really are yummy.  Personally, I think I would've eaten more if my mom hadn't stopped me.  Moms are helpful like that.  They make sure you don't make yourself sick on amazingly wonderful cookies (wink wink).  I know that you all know what I am talking about.  Here it is!  The amazing....


Oatmeal M&M Cookies

1 stick butter
3/4 cup white sugar
3/4 cup packed brown sugar
1 teaspoon vanilla extract
2 large eggs
1 1/8 cup all purpose flour
1 1/8 cup oatmeal flour
1 teaspoon baking soda
1 teaspoon salt
2 cups M&Ms

Directions

Preheat oven to 375*.

Combine all dry ingredients (excluding M&Ms) in a small bowl and set aside.

In a larger bowl mix together all wet ingredients, and add half of flour mix at a time stirring well between additions.  Lastly, add M&Ms and mix well.

On an un-greased cookie sheet, drop about a tablespoons of  batter on the pan two inches apart.

Bake for 9-11 minutes and enjoy!


As I said before, my father and I are having trouble keeping our mouths in check, so have a safe ready to lock them in!

Monday, April 7, 2014

Perfect Lemon Softies

I. love. these. cookies.  Seriously - they almost make me want to sing. Crisp on the outside and soft on the inside, the texture of these tangy morsels adds up to everything I crave in a cookie.  


What's even better is that I don't have to "cheat" to enjoy them.  They are dairy and nightshade free (and whole-ish) so that I can occasionally indulge without any side effects.  (Woo hoo!)  To add to the wonder, there's a secret ingredient too...lemon olive oil!


I would never have thought of putting olive oil in a cookie.  Ever.  In my world, olive oil was for salads, pasta dishes, and sauteeing.  When I saw some lemon olive oil at the grocery store, I put it into my cart expecting to use it on some salmon.  I had no idea how thankful I would later be to find it on the pantry shelf!

While there are other cookie recipes out there that use olive oil, I still wouldn't want to substitute the lemon olive oil for regular EVOO.  Maybe further experimentation will prove otherwise, but I just don't think it would be the same.  Next time I plan on adding some poppy seeds so that it is more like a lemon poppy seed cake.  I also have some ideas about the orange olive oil I saw at a specialty store in town...


 Perfect Lemon Softies 

2 c. flour
1 c. sugar
1 tsp. baking powder
1/2 c. lemon olive oil
1 egg, beaten
1 large lemon, zested and juiced
1/4 t. almond extract
1/4 vanilla bean, split and seeded (use remaining bean shell for vanilla sugar)

Preheat oven to 350* and line a cookie sheet with parchment paper.  In  a medium mixing bowl, combine flour, sugar and baking powder; set aside.

In another small bowl, combine lemon olive oil, egg, juice, zest, extract, and vanilla bean seeds.  

Mix thoroughly and stir into dry ingredients until dough forms.  Scoop batter with a small cookie scoop (filled level) and place 2" apart on prepared pan.  Bake 12-13 minutes in preheated oven.  Remove to wire rack to cool.  Enjoy!


Friday, April 4, 2014

Chocolate Birthday Cake

Hello, everyone! April is a huge birthday month in our house, and for my sister's birthday, I wanted to do a chocolate cake. I finally found this recipe for a homemade chocolate cake. I made it, and it turned out really well! It is best to make it a day in advance and let it sit overnight. 

 Chocolate Birthday Cake

             2 cups white sugar
             1 3/4 cup flour
             1 1/2 tsp. baking powder
             3/4 cup cocoa powder
             1 1/2 tsp. baking soda
             1 tsp. salt
             2 eggs
             1 cup milk
             1/2 cup oil
             2 tsp. vanilla extract
             1 cup boiling water

Preheat the oven to 350* and grease and flour two 9-inch pans. Mix together all of the dry ingredients in a large bowl. Add the eggs, milk, oil, and vanilla and mix well. Pour in the boiling water carefully and stir it until it is well combined. This batter will seem watery, but it will turn out fine. 
Divide the batter evenly between the two pans and bake for 30-35 minutes, or until a toothpick comes out clean. (Bake it for 30 minutes first, then test it with a toothpick to ensure that your cake won't burn. Mine was done within 30 minutes, but baking times vary with different ovens.)
Let the cakes cool for about 10 minutes, then remove them from the pan onto a cooling rack. I really enjoy cake decorating, so I iced and decorated mine. Yum! 


Monday, March 31, 2014

Homemade Vanilla Cookies

Hello Everyone!  Today's recipe was supposed to taste like Nilla Wafers.  It didn't.  I got this recipe from another blogger, and followed the recipe to a tee.  I did size the cookies differently.  Maybe that was what changed them?  If you make it, then tell me how yours turned out!  Here is the link to the recipe!  Cookie Recipe  I will tell you what I did, just in case you want something like a sugar cookie. 


Vanilla Cookies
1/2 cup butter, softened
1/2 cup sugar
1/4 cup brown sugar
1 large egg
1 tsp vanilla extract
1 1/3 cup all purpose flour
1/2 tsp salt
1/2 tsp baking powder
Directions

Preheat oven to 325*.

Line a baking sheet with parchment paper.

In a large bowl, cream together butter and sugars until light. Beat in egg and vanilla extract.

Sift flour, salt and baking powder over the butter mixture and stir to combine.
 
Use a tablespoon to measure out dough onto the prepared baking sheet. Cookies will spread, but only a one and a half inch space is needed between cookies.

Bake at 325 F for 15 to 18 minutes, until cookies are a light golden brown. Baking time will vary depending on the exact size of your cookies. Cool, and enjoy! 


Yum...I wish I still had some, but my family and I devoured them!

Friday, March 28, 2014

Homemade Onion Rings

Hello, everyone! I have a delicious recipe to share with you today! I was going through my mom's old recipe box, and I found this recipe for onion rings! I was really excited to make them, and they turned out very well! Enjoy! :) 


Homemade Onion Rings

                           2 large onions
                           1 cup sifted flour
                           3/4 cup milk
                           1 egg
                           1/2 tsp. salt
                           oil, for frying

Heat the oil in a medium pan. Slice the onions and pop out the layers to make rings. 
Combine all of the remaining ingredients in a small bowl. Once the oil is heated, dip the onions in the batter, making sure they are fully coated. Drop them into the oil, one or two at a time, and fry them until they are brown. They may look burned, but they don't taste like it! They were delicious. I hope you make them and let us know how they turned out!! 

Monday, March 24, 2014

Coconut Preacher Cake

Hello Everyone!  How are you enjoying "spring"?  It may TECHNICALLY spring, but it sure doesn't feel like it.  I don't know about all of you, but I am ready for warmer weather.  Today's recipe is delicious.  I mean REALLY delicious.  


Coconut Preacher Cake
1 1/2 cups sugar
2 cups flour
2 teaspoons baking soda
1/2 cup walnuts
1/2 teaspoon salt
1/2 cup shredded coconut
2 teaspoons vanilla
one 20 oz. can of pineapple, undrained
2 eggs


Frosting
8 oz. softened cream cheese
1/4 cup softened butter
1 3/4 cups powdered sugar
2 teaspoons vanilla
1/4 teaspoon salt
1/2 cup chopped walnuts
1 cup toasted coconut, optional

Directions

Preheat oven to 350*.

 Combine dry ingredients; add wet ingredients and mix by hand.

 Bake in a 9 x 13 greased pan approximately 35-45 minutes. Do not over bake or it will be rubbery.

For the frosting, combine butter, cream cheese and powdered sugar until smooth. Mix in the other ingredients as well and spread on cooled cake in pan.  Enjoy!


My family loves this cake!  I would definitely make it again!

Friday, March 21, 2014

Strawberry Lemonade Poke Cake

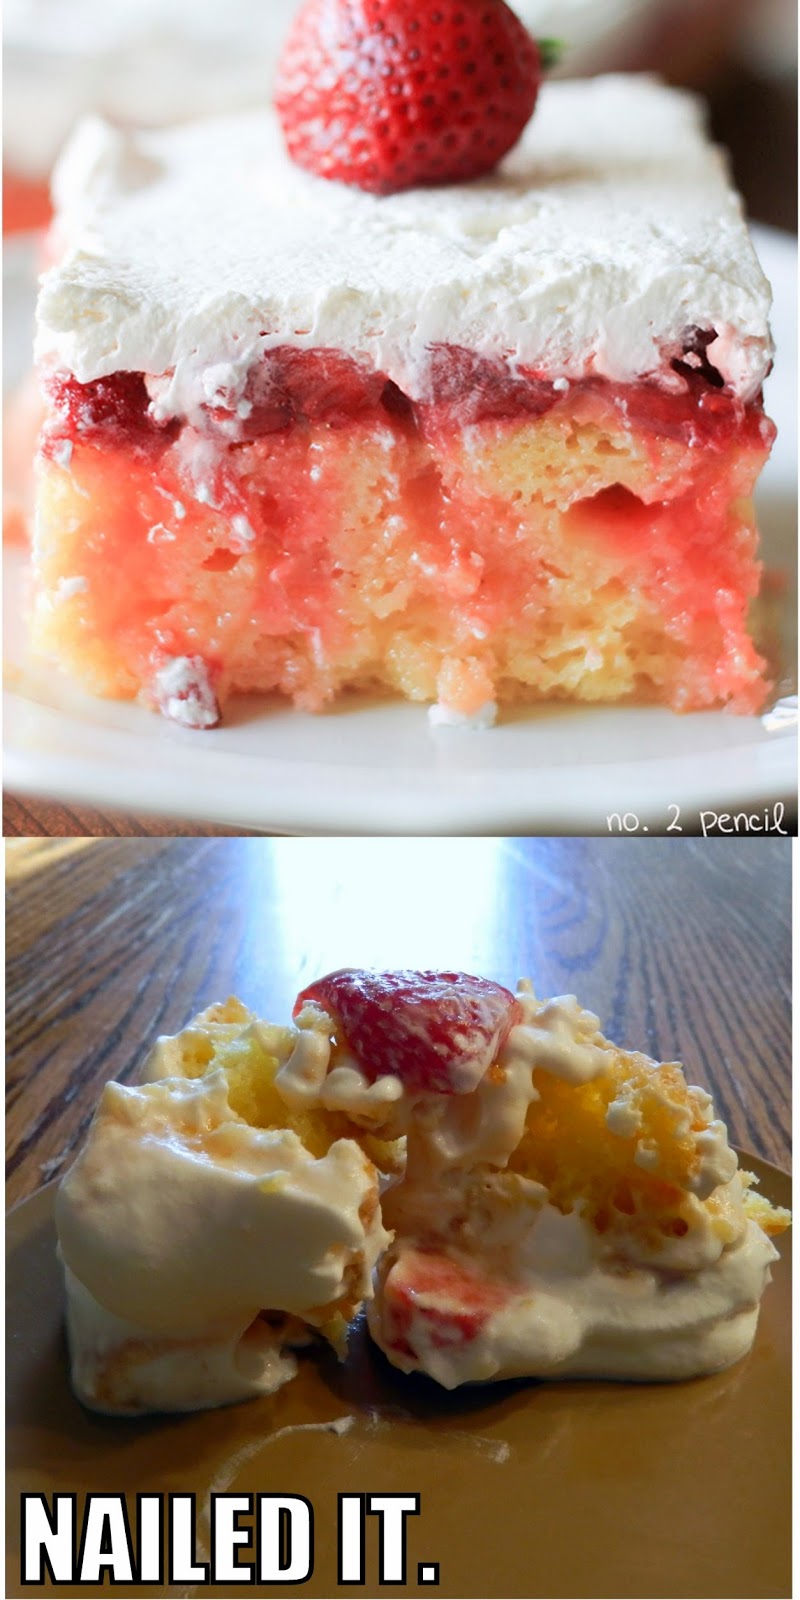
Hello, everyone! I found this recipe at No. 2 Pencil, and I knew I had to try it. Of course, mine doesn't look as good as the original, ( I think my whipped cream was a little too thin still) but it tasted delicious. This is a definite must-have. I hope you enjoy it!! :) 


Strawberry Lemonade Poke Cake

                   Cake:                                                
                                1 box yellow cake mix
                                1/2 cup oil
                                3 eggs
                                1 cup lemonade
                                zest from 2 lemons
                                    
                    Sauce:
                               1 carton strawberries (1 lb.) 
                               juice from one lemon
                               1/4 cup sugar
                               1 jar lemon curd (1o oz.)
                               1/8-1/4 cup lemonade

                    Whipped cream:
                         2 cups heavy whipping cream
                         1/4 cup sugar
                         1 tsp. vanilla 

Slice the strawberries and put them into a medium bowl. Mix in the lemon juice and sugar. Let it sit in the refrigerator for a few hours. Meanwhile, prepare the cake. 

Preheat the oven to 325*, or whatever your box mix says to do for a 13x9 glass pan.
Grease the bottom of a glass 13x9 pan and set aside. 
Prepare the cake mix as directed, substituting lemonade for the water, and adding the lemon zest. Bake as directed on the package. Set the cake aside to cool. 

Take your strawberry mixture out of the refrigerator and strain the juice into a small bowl. Set aside the strawberries. Mix the lemon curd in with the juice. I ended up using a hand blender, because of the chunks. Add lemonade until it is a pouring consistency. 

Poke holes in the top of the cooled cake with a straw or wooden spoon handle. Pour the juice over the top, making sure the juice soaks into the holes on the cake, then place the strawberries on top of the cake. 

Whip the cream, sugar and vanilla together until it is thick. (Mine was too runny, so make sure it is whipped well.) Spread it over the cake. Refrigerate for a few hours, slice and enjoy! This gets better and better as it sits, because the cake soaks up the juices. It didn't really last that long at my house, though. I hope you make it and let us know how it turned out!! 


I love the "Nailed it" pictures that people do with flopped projects...I made this picture with the first slice I took out, because I didn't get a good angle on it and it got kinda' mangled...I did a little more to it to make it fit the picture. You can see from this that my icing was a little too runny...Thankfully, the rest of the cake didn't turn out like this! :)