Monday, March 31, 2014

Homemade Vanilla Cookies

Hello Everyone!  Today's recipe was supposed to taste like Nilla Wafers.  It didn't.  I got this recipe from another blogger, and followed the recipe to a tee.  I did size the cookies differently.  Maybe that was what changed them?  If you make it, then tell me how yours turned out!  Here is the link to the recipe!  Cookie Recipe  I will tell you what I did, just in case you want something like a sugar cookie. 


Vanilla Cookies
1/2 cup butter, softened
1/2 cup sugar
1/4 cup brown sugar
1 large egg
1 tsp vanilla extract
1 1/3 cup all purpose flour
1/2 tsp salt
1/2 tsp baking powder
Directions

Preheat oven to 325*.

Line a baking sheet with parchment paper.

In a large bowl, cream together butter and sugars until light. Beat in egg and vanilla extract.

Sift flour, salt and baking powder over the butter mixture and stir to combine.
 
Use a tablespoon to measure out dough onto the prepared baking sheet. Cookies will spread, but only a one and a half inch space is needed between cookies.

Bake at 325 F for 15 to 18 minutes, until cookies are a light golden brown. Baking time will vary depending on the exact size of your cookies. Cool, and enjoy! 


Yum...I wish I still had some, but my family and I devoured them!

Friday, March 28, 2014

Homemade Onion Rings

Hello, everyone! I have a delicious recipe to share with you today! I was going through my mom's old recipe box, and I found this recipe for onion rings! I was really excited to make them, and they turned out very well! Enjoy! :) 


Homemade Onion Rings

                           2 large onions
                           1 cup sifted flour
                           3/4 cup milk
                           1 egg
                           1/2 tsp. salt
                           oil, for frying

Heat the oil in a medium pan. Slice the onions and pop out the layers to make rings. 
Combine all of the remaining ingredients in a small bowl. Once the oil is heated, dip the onions in the batter, making sure they are fully coated. Drop them into the oil, one or two at a time, and fry them until they are brown. They may look burned, but they don't taste like it! They were delicious. I hope you make them and let us know how they turned out!! 

Monday, March 24, 2014

Coconut Preacher Cake

Hello Everyone!  How are you enjoying "spring"?  It may TECHNICALLY spring, but it sure doesn't feel like it.  I don't know about all of you, but I am ready for warmer weather.  Today's recipe is delicious.  I mean REALLY delicious.  


Coconut Preacher Cake
1 1/2 cups sugar
2 cups flour
2 teaspoons baking soda
1/2 cup walnuts
1/2 teaspoon salt
1/2 cup shredded coconut
2 teaspoons vanilla
one 20 oz. can of pineapple, undrained
2 eggs


Frosting
8 oz. softened cream cheese
1/4 cup softened butter
1 3/4 cups powdered sugar
2 teaspoons vanilla
1/4 teaspoon salt
1/2 cup chopped walnuts
1 cup toasted coconut, optional

Directions

Preheat oven to 350*.

 Combine dry ingredients; add wet ingredients and mix by hand.

 Bake in a 9 x 13 greased pan approximately 35-45 minutes. Do not over bake or it will be rubbery.

For the frosting, combine butter, cream cheese and powdered sugar until smooth. Mix in the other ingredients as well and spread on cooled cake in pan.  Enjoy!


My family loves this cake!  I would definitely make it again!

Friday, March 21, 2014

Strawberry Lemonade Poke Cake

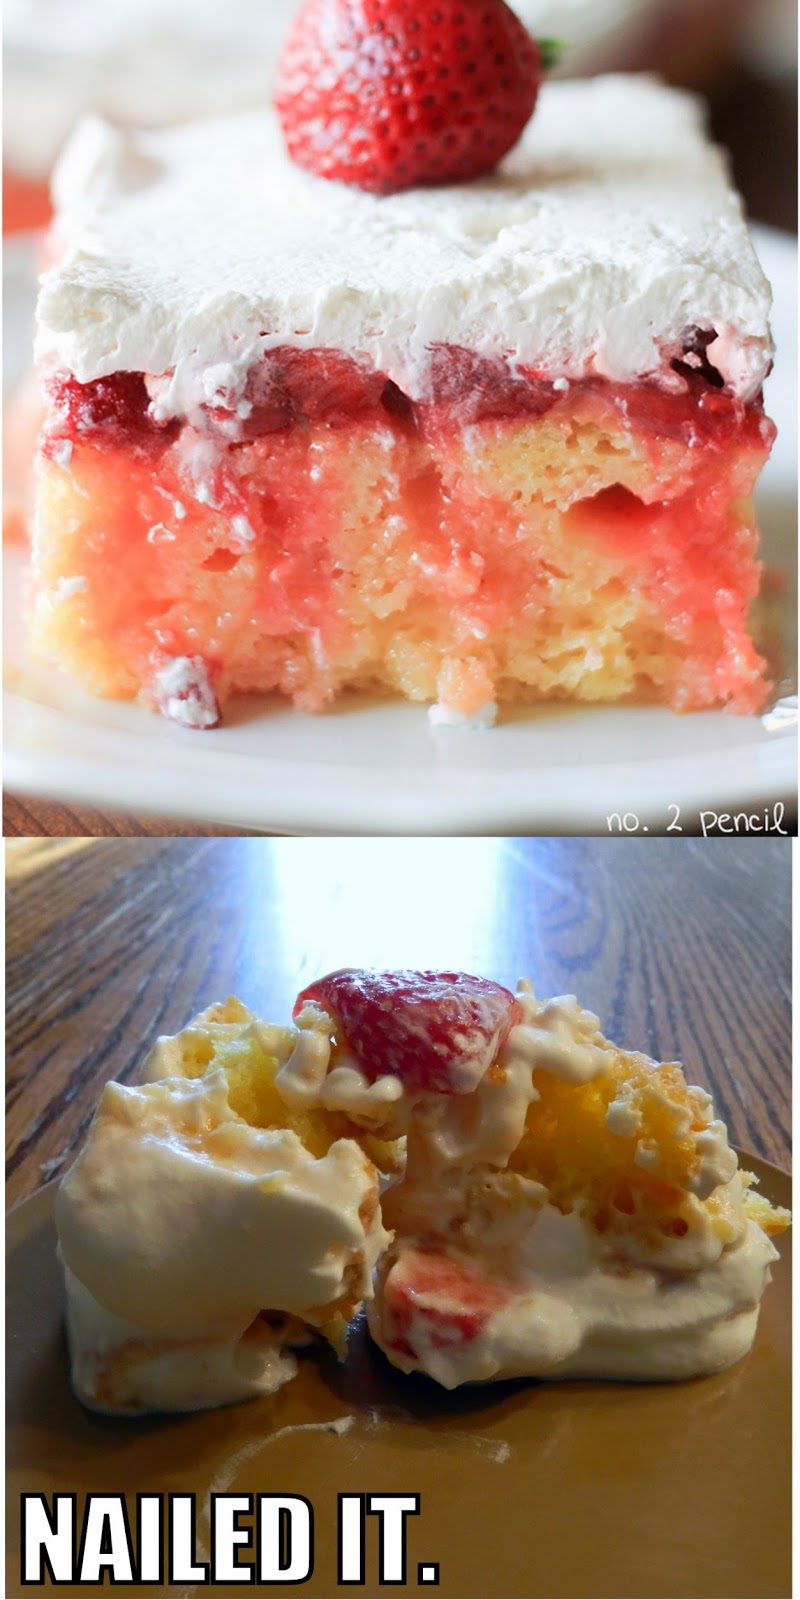
Hello, everyone! I found this recipe at No. 2 Pencil, and I knew I had to try it. Of course, mine doesn't look as good as the original, ( I think my whipped cream was a little too thin still) but it tasted delicious. This is a definite must-have. I hope you enjoy it!! :) 


Strawberry Lemonade Poke Cake

                   Cake:                                                
                                1 box yellow cake mix
                                1/2 cup oil
                                3 eggs
                                1 cup lemonade
                                zest from 2 lemons
                                    
                    Sauce:
                               1 carton strawberries (1 lb.) 
                               juice from one lemon
                               1/4 cup sugar
                               1 jar lemon curd (1o oz.)
                               1/8-1/4 cup lemonade

                    Whipped cream:
                         2 cups heavy whipping cream
                         1/4 cup sugar
                         1 tsp. vanilla 

Slice the strawberries and put them into a medium bowl. Mix in the lemon juice and sugar. Let it sit in the refrigerator for a few hours. Meanwhile, prepare the cake. 

Preheat the oven to 325*, or whatever your box mix says to do for a 13x9 glass pan.
Grease the bottom of a glass 13x9 pan and set aside. 
Prepare the cake mix as directed, substituting lemonade for the water, and adding the lemon zest. Bake as directed on the package. Set the cake aside to cool. 

Take your strawberry mixture out of the refrigerator and strain the juice into a small bowl. Set aside the strawberries. Mix the lemon curd in with the juice. I ended up using a hand blender, because of the chunks. Add lemonade until it is a pouring consistency. 

Poke holes in the top of the cooled cake with a straw or wooden spoon handle. Pour the juice over the top, making sure the juice soaks into the holes on the cake, then place the strawberries on top of the cake. 

Whip the cream, sugar and vanilla together until it is thick. (Mine was too runny, so make sure it is whipped well.) Spread it over the cake. Refrigerate for a few hours, slice and enjoy! This gets better and better as it sits, because the cake soaks up the juices. It didn't really last that long at my house, though. I hope you make it and let us know how it turned out!! 


I love the "Nailed it" pictures that people do with flopped projects...I made this picture with the first slice I took out, because I didn't get a good angle on it and it got kinda' mangled...I did a little more to it to make it fit the picture. You can see from this that my icing was a little too runny...Thankfully, the rest of the cake didn't turn out like this! :) 


Monday, March 17, 2014

This One is a Winner!

Hello Everyone!!!  Yesterday at my church there was a soup competition.  I entered my Loaded Baked Potato Soup,and won second place!  I was extremely excited. There were at least fourteen competitors, all of them adults! I received a $15 gift certificate to a store by where I live, called the Galena Garlic Company.  I bought five different bags of spices that may appear in future recipes.  Bonus to anyone who finds them when they are used!  Below I have pictures of the second place certificate, and the spices I bought with my prize money.
 

It may not look that exciting, but I was so happy I got dizzy!
 

If you can't read the labels in the picture, this is what was on the labels from left to right :  Autumn Spice Blend, Chophouse Apple Butter Rub, Buffalo Wing Rub, Apple Maple Seasoning, and the Galena Garlic Blend.  As you can tell, I really enjoy the rubs!

Sushi Lover's Eggs

We raise chickens, so one ingredient we always have on hand is eggs.  We are always looking out for new ways to use them, especially for a meal other than breakfast. 

The boys have been having egg salad sandwiches for lunch this week to use up the three dozen hard boiled eggs sitting in the fridge.  I guess I was feeling a little experimental when creating today's recipe.  I love sushi and other Asian foods, but due to some diet restrictions I haven't been able to enjoy them as I used to.  This is my rural mid-west interpretation of one of my favorite foods using something we have in great abundance!


Sushi Lover's Eggs

Hard boiled eggs, peeled and sliced in half lengthwise
Gluten Free Reduced Sodium Soy Sauce
Black roasted sesame seeds
Finely ground black pepper
Ground ginger
Real salt
Roasted seaweed sheets (Yaki Sushi Nori), cut into thin strips

With egg halves arranged yolk up on plate, place 2-3 drops of soy sauce on the yolk of each egg.  Sprinkle generously with roasted sesame seeds.  Lightly sprinkle each egg with black pepper.  (I like to give the spice container two "taps" over each egg).  Repeat with the ginger and salt.   Top with a pinch of roasted seaweed strips and enjoy!  Chopsticks optional :)


Friday, March 14, 2014

Peanut Butter Sandwich Cookies

Hello, everyone! Today I have a recipe for peanut butter cookies. I found these when I was looking through our Taste of Home baking book, and I was surprised that I had never put them up here, since I have made them so much. Koko posted a recipe for peanut butter cookies awhile ago, but these are slightly different. They have peanut butter icing in between two cookies. It really takes it over the top. They are delicious.


                     Peanut Butter Sandwich Cookies

Cookies:
                    1 cup peanut butter
                    1 cup shortening
                    1 cup brown sugar
                    1 cup white sugar
                    3 eggs
                    1 tsp. vanilla
                    3 cups all-purpose flour
                    2 tsp. baking soda
                    dash of salt

Icing:
                   1/2 cup peanut butter
                   3 cups powdered sugar
                   1 tsp. vanilla
                   5-6 Tablespoons milk

Preheat the oven to 375*. In a large bowl, cream the peanut butter, shortening and sugars until light and fluffy. Add the eggs and vanilla and mix well. Add the dry ingredients and mix until they are moistened. 
Shape into 1-inch balls and place on an ungreased cookie sheet two inches apart. Flatten with a fork. Bake for 6-8 minutes, or until brown. Place on wire racks to cool. 
For the icing, simply mix all of the ingredients together until smooth and spreadable. Spread onto a cooled cookie, then place another cookie on top. Yum! 


Monday, March 10, 2014

Calamansi Baked Salmon

Hello, everyone! This is Sarah popping in again.  I discovered a foodie find so great that I had to tell you about it and share a recipe! 

My husband and I took a day trip into Madison a couple of weeks ago.  We stopped in Penzey's spices (Yum!) on University Ave., and were bringing our bag of delicious goodies back to the car.  We had noticed a vinegar-oil-spirits store next door and were deciding whether we should go in or not.  As  we were deliberating, a big black SUV pulled up next to us and rolled down the window.   Though slightly startled, we were relieved to find a friendly face leaning over towards us.  The driver asked us if we were thinking about going into Vom Fass - the store next door.  When we confirmed her suspicion, she enthusiastically said that we HAVE to go in - even if just to check it out.  That was all the encouragement we needed!  We dropped the spices off in the car and headed to the door.


God bless that sweet stranger.  We had no idea what kind of taste sensations awaited us!  Long story short, we had a great time tasting rich oils and fragrant vinegars and spirits.  The staff was fantastic, and we came home with a few of our favorites.  Calamansi Balsam Vinegar was the first one we tried, and it was our first choice to buy.  It has a rich citrus taste that compliments fish, so I couldn't wait to try it out on some salmon.

If you can't get your hands on some Calamansi, you could try replicating the flavor with a little seasoned rice vinegar and some freshly squeezed tangerine or mandarin juice.


Calamansi  Baked Salmon

1 Tbs. garlic infused olive oil (divided)
2 large Atlantic Wild Salmon fillets
1 Tbs. Vom Fass Calamansi Balsam Vinegar
1/4 tsp. dried rosemary, crushed
dried thyme (optional - we didn't use this)
 white pepper
real salt
thinly sliced red onion
mixed spring greens salad
parsley for garnish (optional)

Preheat oven to 350*.  Pour 2 tsp. garlic infused olive oil on the bottom of an 8x8 (or similar sized) baking dish.  Place salmon fillets skin side down in baking dish.  Pierce filet with fork several times.  Brush fillets with Calamansi vinegar, allowing any extra to pool in the bottom of the baking dish.  Try to get the vinegar into the pierced spots of the fillet!  Brush on remaining garlic olive oil.  Sprinkle with rosemary, as well as white pepper (to taste).  Cover dish with aluminum foil.  Bake 12-15 minutes in prepared oven, or until salmon separates into moist, plump flakes when cut with a fork.  Do not over bake.

Just before serving, place fillets on top of a pile of mixed spring greens.  Pour any extra juices from the pan over the fillets for extra flavor.  Sprinkle with real salt. Top with wafer thin slices of red onion, and optional parsley garnish. 

Serve alongside white rice (we sprinkles ours with black roasted sesame seeds - it was perfect!).

Friday, March 7, 2014

Mocha Cupcakes with Espresso Buttercream Frosting

I love cupcakes. I don't know about you, but to me, a little cake with icing piled high is irresistible. I found this recipe and knew I had to try it. The original called for espresso powder, which I didn't have. I used instant coffee, and it wasn't as strong as I would like, but it is still really tasty. I hope you enjoy them! :) 


  Mocha Cupcakes & Espresso Buttercream Frosting

      Cupcakes:
                     1 1/3 cups all-purpose flour
                     1/3 cup cocoa powder
                     1 tsp. baking powder 
                     1/2 tsp. baking soda
                     1/4 tsp. salt
                     1/2 cup milk
                     1/2 cup strong brewed coffee
                     1 1/2 tsp. instant coffee granules
                     1 tsp. vanilla
                     1/2 cup butter, softened
                     1/2 cup sugar
                     1/2 cup brown sugar
                     1 egg

    Frosting:
                     1 cup butter, softened 
                     2 1/2 cups powdered sugar
                     1/4 cup strong brewed coffee
                     1 1/2 tsp. vanilla
                     1 Tablespoon milk

Preheat the oven to 350*.
Mix the instant coffee granules and the hot brewed coffee until the instant coffee is dissolved. Set it aside to cool. 
Meanwhile, whisk together the flour, cocoa, baking powder, baking soda, and salt. 
In a separate bowl, using a hand mixer, whip the butter and sugars until fluffy. Add the egg and set aside.
Now take your coffee, and add the milk and vanilla. Alternate with the flour mixture and add it to the butter and sugars. Mix it until well combined. 
Distribute the batter evenly between paper lined muffin tins. Bake for 20-22 minutes, or until a toothpick inserted comes out clean. Set the cupcakes on a cooling rack to cool and make the icing. 
In a stand mixer, whip the butter on high speed until smooth. Add the powdered sugar gradually, mixing well after each addition. Add the coffee, vanilla, and milk and whip for a few more minutes until it is well combined and smooth. 
Fill a piping bag fitted with a 1M tip with the icing and pipe onto the completely cooled cupcakes. Enjoy! :) 

Recipe adapted from: Brown Eyed Baker 


Monday, March 3, 2014

Mini Oatmeal Breakfast Bites

Hello Everyone!  I am so happy this recipe was delicious.  The reason I am so happy is because I made it up!!!  This recipe, in my opinion, is best either the first day warm or the second day cold.  My mom has made something called baked oatmeal, and these breakfast muffins are reminiscent of that.


Mini Oatmeal Bites
1 cup oat flour
1/4 teaspoon baking powder
1 teaspoon cinnamon
1 egg
1 teaspoon coconut oil + more to grease pan
1/4 cup water
1/8 cup honey
1 small banana

Directions

Preheat oven to 350*.

Grease mini muffin pan with coconut oil.

Combine all ingredients and fill mini muffin cups about 3/4 of the way full.  Bake for 8 to 10 minutes or until toothpick inserted in the center comes out clean.


I hope these come in handy some time!  My family really enjoyed them!